Pages

Monday, February 28, 2011

Pink Hippo Party #18

Happy Monday everyone!  No features today as I was up ALL night with my littlest guy who is down with the stomach virus.  Poor guy.. bronchitis now this.. ugggh!  I will post my favorites later in the week.. in the meantime here are the rules to the party!

1. Grab a party button
2. Link back to this party
3. Link to your specific post and not your home page
4. Become a follower (cause it's just nice)
5. Don't forget some love to your fellow crafters.. everyone loves a compliment!
Now let's get this party started!


Love,
Pinkapotamus

Sunday, February 27, 2011

Chocolate Covered Nutella filled Girl Scout Cookies! Oh Yeah!


It's that time of year again.. that's right Girl Scout cookie season.  This year I am not only the fearless LEADER but ALSO the Cookie Mom. 


It's a big job .. but somebody's got to do it!  So that means that I had to order all of the cookies.. which means that there is also a surplus of about 40 boxes to be sold.  So I bought myself a box of Trefoils and thought they they would be even better if only they were covered in chocolate and filled with Nutella!  (and of course some with peanut butter so that my family does not die from chocolate overload!)  So here is how I made these awesome confections!

Ingredients
1 Box Trefoils
peanut butter
nutella

Chocolate coating
1 1/2 cups chocolate chips
2 TBLS butter
1/4 cup light cream

Start by peanut buttering and Nutellaing (yes I used it as a verb!) half of your Trefoil cookies.
Then sandwich them together and place on a cookie sheet lined with parchment.
Next start making your chocolate for dipping. Melt your chocolate chips with butter in the microwave.


 Start with 30 seconds then mix and repeat. It will be the consistency of icing.
Add 1/4 cup of cream and mix until smooth!
Now dip your cookies!

When all your cookies are dipped place in refrigerator for
15 - 30 minutes to set up.
So eat up and enjoy and don't forget to share cause it's the Girl Scout thing to do!

Love,
Pinkapotamus

Friday, February 25, 2011

Little Leprechauns!

Who could forget these adorable little "love bugs"? 

Certainly not me.. especially since they won't let me!  So I decided that in honor of St Patty's Day they needed to bring a little luck to this semi Irish household!  So here they are remade into my Lucky Little Leprechauns!
And here is a quick tutorial on you can score some luck of your own!

Ingredients
four wood blocks of varying sizes
acrylic paint
paint chip samples
Mod Podge
cut out heads
rainbow colored ribbon
a little imagination!

I started with my four wood blocks.  I painted them to look like grass and sky. 

Then I made a template for the Leprechaun outfits the kids would wear. 

Then I cut the shapes of their outfits out of the paint chips.

  Once they were cut out I Mod Podged them down onto the corresponding block. 

Then I used my Cricut to cut out the word "Lucky".  
And of course every Leprechaun HAS to have a pot of gold!  So I made mine out of black paper and pom poms.
Last I added ribbon to the back in the shape and colors of a rainbow.

Now I have one very unhappy 5 year old who did not want to be a "Love Bug" and is even more horrified to be made into a Leprechaun.  But I had a lot of fun making it.. so there!  (insert rasberry sound here!)
I am sharing with
SYTYC

</ center="">


Fantabulous Friday!


BWS tips button

giveaways


Photobucket


Lamb Around
Love,
Pinkapotamus
Enhanced by Zemanta

Thursday, February 24, 2011

Family Photo Collage

Not much crafting going on around here today as my littlest guy is down with Bronchitis.. Poor baby!  So in the meantime I thought I would share this simple collage gift that I gave my mother in law last year for her birthday!

Now I don't have any pictures of how I made it.. but here are the ingredients to make your own and a verbal tutorial!

Ingredients
3 6" wood boxes
acrylic paint
wood letters
pictures
Mod Podge
wood glue
craft glue

Start by glueing the wood boxes.  I glued them together so that two were showing the recessed area and the middle one was not.  They will need to be held together with clamps.  Then you will paint the inside of two white and outsides of each box black.
Paint the letters the color of your choice.. I used to word FAMILY but you could use your last name or some other meaningful word like BLESSED or LOVED.  When all of the paint is dry lay the picures on the frames with the word to make sure that all of the pictures fit.  This may take some time.  Then when you have the placement just right get to work Mod Podgeing them on!  When the Mod Podge is dry use your craft glue and glue the letters. 
Voila.. a fun family photo collage!  Say that 5 times fast.. I dare you!
I'm sharing with

Love,
Pinkapotamus
P.S.. is anyone else starting to notice a pattern in my color choices?  Black and white seem to be the answer to EVERYTHING!


Wednesday, February 23, 2011

Upcycled Key Board

Hello!  Remember me?
This thing has been following me around for YEARS!  And I have never hung it up or used it or done anything with it other than box it up and move it from one state to another and from one house to another...
That is until now!
This is how I looked a few months ago.. but now I have been totally transformed into THIS:
Ahhh!  Much better.. and here is my journey from trash to treasure!

First I taped the board and then painted it black.  (Of course after I taped it I realized that it was just like a picture from and the mirror came out.)


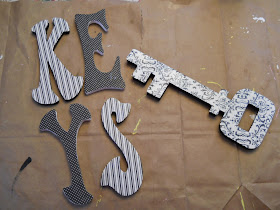
While the paint was drying I traced the letters to spell KEYS and the actual Key on the black and white paper that I chose and cut it out.

Then I painted two letters white and the key and two letters black.  Both sides.

Once the paint dried then I Mod Podged my paper to my letters.
This is how they looked when they were all Mod Podged together.

Then I glued it all together and added some hooks to hang the keys from and Voila!  A new keyboard for my kitchen!
And here is a sneak peek at what is next on my upcycling agenda!

Can't wait to share the BIG reveal! 
I am sharing with
Beyond The Picket Fence
Love,
Pinkapotamus