Friday, August 31, 2012

Blog Angel.. The BIG Reveal!

For those of you who have been waiting with baded breath.. the wait is FINALLY over... and the secret will be revealed..  because I am a BLOG ANGEL to .......
Now I have been a SUPER lucky girl to have gotten Bethany to be a Blog ANGEL for because in my book Bethany is a crafty Rockstar and of course our blogs are pretty similar being that we BOTH have craft blogs!
Bethany makes some really awesome crafty stuff.. so here are some of my favorites from this month!
I love a great upcycle so of course I just adored this amazing Lamp Makeover
Bethany also makes gorgeous jewelry and this was one of my favorite pieces that she created! 
In the past month, I had lots of fun being a sneaky ANGEL .. she had asked for more comments on her blog posts, so of course I just HAD to stop by and comment often, sometimes as myself and still other times as Anonymous!  I shared some of my favorite posts of hers on my Facebook page for my followers to enjoy and she was even a GUEST blogger for my vacation (which I am still on).. which you can check out HERE
And of course, since I knew that she was a crafty blogger.. I was soo happy to send her a little crafty care package from my craft room to HERS!
OH and guess what else?  I have a blog angel too!  Crazy right, cause silly me.. I never put two and two together and guessed that someone was helping ME too until the halfway post.. but she has yet to be revealed to me.. but you guys will be the next to know!
Hope you guys join in on all of the blog angel fun when the next signup comes to town in OCTOBER because seriously it's really GREAT!
CraftboticBlogAngels
Love,
Pinkapotamus

Thursday, August 30, 2012

Nugget on A Budget Guest Post

 Hello lovelies! I'm Kera from Nugget On A Budget and I'm super excited to be featured here on Pinkapotamus today! As most of you know, Amie is on vacation and she needed a few volunteers to guest post on her blog while she's gone. I started making headbands for my daughter a few months ago and Amie asked if I would feature a tutorial on how to make them. This is actually my first tutorial, so lucky you! I'm thinking about opening a shop on Etsy in the near future, so I hope you enjoy!
What You'll Need
Hot glue gun
Scissors
Ruler
Silk flowers
1/2 inch of ribbon
Craft buttons and/or craft beads
Metal single-prong clips
Little girls' stretchy headbands
>> I bought the flowers, ribbon, and craft buttons/beads at Michael's, the metal clips at Sally Beauty Supply (you can also get them off of Amazon here), and the headbands at Kohl's in the girls department. What You'll Do (1) Disassemble the flower. >> Pull off the flower head from the stem and take apart the the flower layer by layer.
>> Hot glue the flower layers back together, one on top of the other.
>> After all layers are re-assembled, hot glue either a craft button or three craft beads in the center of the flower. I chose to use beads for this project.
(2) Attach ribbon to the metal clip. >> Measure out about 8 inches of ribbon. This should give you enough to cover the metal clip completely.
>> Place a thin line of hot glue on the metal clip and attach the ribbon. Do this around the entire clip, so that no metal is showing anywhere.
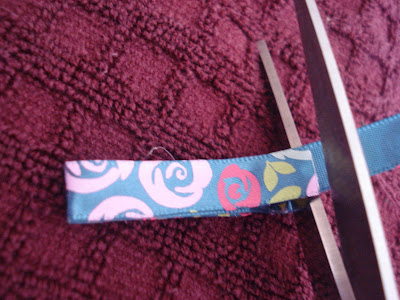
>> Cut off any additional ribbon that's left over.
(3) Attach the ribbon-covered clip to the back of the flower. >> Place a line of hot glue across the back of the flower, in the center.
>> Attach the clip with the flat side of the clip facing OUT.
(4) Attach the newly made flower clip to the stretchy headband of your choice, and Voila!
Other Adorable Variations (and just as easy!)
>> Place a craft button in the center of the flower instead of the beads. Or use a felt object, such as the ladybug I used for my daughter. Round-ish objects are best, hearts also work well.
>> Use a different type of silk flower and place a rhinestone in the center.
>> The flowers can be big or small (I personally think the bigger, the cuter!) Just make sure the type of silk flower you choose can be easily taken apart and its layers easily re-assembled.
>> If your little girl is older (or you just have a baby with lots of hair), you can use just the flower clip in her hair instead of attaching it to a headband. The thing I like about these are their versatility! 

Wednesday, August 29, 2012

A Sweet Rosie Home Guest Post

Pin It


Hi there all you Pinkapotamus readers!  I very happy to share these starfish today.  My name is Rose and I'm a mom of 3 beautiful kids and a wife to an amazing husband who works hard so I can stay at home.  My blog is A Rosie Sweet Home where I share whatever makes me happy, which usually is crafts, DIY tutorial, recipes, and things I do with my family.  On my blog I'm totally myself and make all kind of mistakes but I'm not afraid to show them.  I want my blog to be a comfortable and inviting place to visit.  I love pretty things, going thrift store shopping, and any thing artistic.  I am excited about every visitor to my blog so I hope you stop by and say hi.


At the beginning of August I threw a Mermaid theme birthday party for my little girl, these starfish were part of the decorations.  I'm going to show you how I made them.  

First you need to make the dough,  it is a simple salt dough recipe.

2 cups all purpose flour 
1 cup salt
1 cup water

After you mix the dough roll it into a log about 10 inches long and cut it into 7 equal parts. 


Take one of the sections and divide that into 5 section. 

Roll them out in between your hands until they are as long a your finger and a little tapered on one end. 

Press the wide ends together in the shape of a starfish.  Use some water on your finger to smooth out the seams from where you pressed the legs together. 

Use a fork and poke holes all over the star fish. Then set them out to dry.  I let my star fish dry in the air for a week.  If you need them faster you can bake them at 250 for 3 hours.

If you air dry them they will have a white appearance in color if you bake them they will appear dark in color and you will have to paint them white, which looks good too.  

After they are all dry and painted {if you need to do that} then spray them with a clear Sealer or Finish. This will seal them and they will last a lot longer.


 These make a great decoration for any sea side theme room or party.  I hope you enjoyed this little tutorial.


Tuesday, August 28, 2012

While Wearing Heels Guest Post

It could be the location of your first date, your wedding, your honeymoon or where your child was born, let those memories remain 'timeless' forever.


First you need a clock.  Mine came from Goodwill {shocking, I know}.  It had great shape and weight and was begging for an updated look. For $6.99, I decided she had to be mine.


Give your clock a pep talk, preparing her for what's to come.  You do not want to 'tick' her off.

Carefully take your clock apart.  You'll need to raid your tool box for things like a wrench and screwdriver.


Do you remember the Vintage World Maps Calendar I got for half off the beginning of the year?  I decided to use one of those maps.  I traced the clock front to the size I needed and cut it out.


Sorry for the lack of pictures for the next few steps.  You'll want to cut out a circle in the center, for the clock hands to fit back into.  Replace the clock front with your map and seal it with Mod Podge or you could even glue it into place.


Take it a step further and add a bead or a pin to the exact location you want to remain timeless.


Put your clock back together and enjoy.


No matter how much time has passed, cherish all your memories.

Sunday, August 26, 2012

Pink Hippo Party #93

Hey Pink Hippos!  Happy Monday!  I am STILL on vacation.. aren't I a lucky girl?
Party on without me and I will be back next week with LOTS to share! 
So remember.. Grab a button, link up, be a follower and Share some sweet comment love!
Pink Hippo Party
Love,
Pinkapotamus

Friday, August 24, 2012

Rachel Shearer Guest Post

Hey there readers of Pinkapotamus!! I'm so excited to be posting here today! My name is Rachel Shearer, 17 year old photographer :) I blog over at Hidden Beauty Photography, and love love to share on my Facebook page!
I honestly couldn't believe it when Amie asked me to guest post -- mostly because of what she wanted me to post about! 
My jewelry organization! (Yes, that is a custom name plaque from Pinkapotamus, isn't it gorgeous??)
All of my organizers I've made/fixed up myself -- they aren't the best, but hey, they work!

The first is for my earrings!
I saw pictures of these all over the place! So, when I started to collect more earrings, I decided I wanted to make one! Everything I used I found in my house.
There was an old frame I couldn't use because it didn't have a stand or a hanger....
Some mesh we had laying in our basement....
Some lace and little rope...
And, my materials for making little flowers!
Once I had it all, I sanded the frame a little around the edges just to smooth it out a bit. When that was done, I stapled the mesh to the frame! After that, I stapled the rope and lace. I thought it looked a little bare, which is where the flowers came in! I put them together real fast then hot glued them onto it, and voila it was done!!

A little while later, I found an old, rusty metal storage bin. I was looking at the design, and I imagined something I could hang necklaces from, store rings and bracelets on, and store odds and ends under! I scrubbed it down the best I could, and found some red paint. I put on a couple coats, then sprayed a clear finishing coat on it! 
When it was dry, I decorated it a little bit, to make it not so plain!
After a while though, I knew I needed something better for my necklaces (which I had wanted for a while, but didn't have anything to do it with). One day, my neighbors were cleaning out their storage shed. They let me look through the things they were getting rid of, and in the pile of odds and ends, I found a cute little plaque with a name on it! I knew I could peel the letters off, so I grabbed it. After which, I found a bag of knobs -- it was just what I needed! After that, all I had to do was drill the holes and screw in the knobs! 
The last part may have been the absolute easiest... While my brothers and I were moving rooms after my sister moved out, I found an old, beat up jewelry box in my brothers room. It was covered in stickers, scratched, and it was missing a knob. After looking it over, I knew that it would be really easy to fix up. All I had to do was peel the stickers off, wash it all down, and paint it. My Dad had to get some paint for a door anyways, so he got a white I would like too! Then, I just painted it. I still haven't replaced the knob, but I'm not worried about it. I don't really need one there! It's not the best paint job, but I really didn't think anyone would be looking close enough to notice the paint on the inside. Guess I didn't think I would be asked to talk about it ;)
Inside the jewelry box, I keep my stud earrings, bracelets (not bangles) and all of the necklaces that are small enough that it's okay for me to not hang them up!
I love organization, but my favorite is organization that looks cute! So, this was my way to do that! I'm very happy with it, and proud of it!
Granted, they aren't the prettiest in the world, but I made them, and they aren't hideous, and I love them!

So, there's the story about my jewelry organizers! Now that you know how easy it is, you can make some too. And most likely, they'll be even better than mine!!!
Thank you so much for having me, Amie!!